


CalenGoo can sync with Google Calendar and with the iPhone/iPad calendar. That means it can exchange events and other information to show you the content of your Google Calendar or iPhone/iPad calendar and allow you to modify it. To sync with Google Calendar, CalenGoo needs to run its synchronization. During the synchronization CalenGoo uploads changes that you previously entered with CalenGoo and downloads changes that you made with Google Calendar since the last time CalenGoo synced (please see synchronization description for technical details how the sync works if you are interested). There are different ways to run the synchronization:
Sync types (Auto sync, Sync on exit)
There are different options to control the sync with Google Calendar available. CalenGoo can sync when it is started and when it is exited:Auto sync
If "Settings > Auto Sync" is turned on, CalenGoo will automatically start the sync each time it is started.
Under “Settings > Display and Use > General > Min. time between auto syncs” you can specify the minimum time between two automatic syncs. It affects “Auto sync” and “Sync on exit”. Both will only start the sync when the last sync (auto or manual) was longer ago than the time specified here.
Under “Settings > Display and Use > General > Min. time between auto syncs” you can specify the minimum time between two automatic syncs. It affects “Auto sync” and “Sync on exit”. Both will only start the sync when the last sync (auto or manual) was longer ago than the time specified here.
Sync on exit
If “Settings > Display and Use > General > Sync on exit” is turned on, the sync will be started when you leave CalenGoo. Apps can run up to 10 minutes after you left the app. When “Sync on exit” is turned on, CalenGoo will use this time to run the sync.
Under “Settings > Display and Use > General > Min. time between auto syncs” you can specify the minimum time between two automatic syncs. It affects “Auto sync” and “Sync on exit”. Both will only start the sync when the last sync (auto or manual) was longer ago than the time specified here.
Under “Settings > Display and Use > General > Min. time between auto syncs” you can specify the minimum time between two automatic syncs. It affects “Auto sync” and “Sync on exit”. Both will only start the sync when the last sync (auto or manual) was longer ago than the time specified here.
Additionally you can start the sync manually in the following ways:
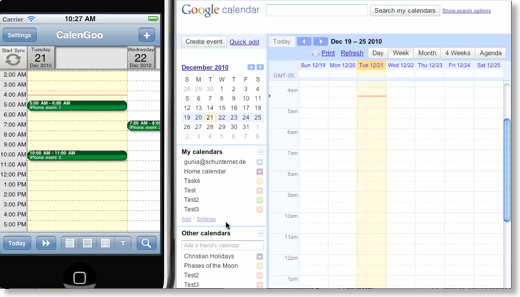
- By tapping the “Start Sync” button in the upper left corner of the day view.
- With “Settings > Sync now”.
- By turning “Settings > Display and Use > Advanced > General > Shake to sync” on and shaking your device to start the sync.
- on the iPad: With the sync button to the left of the search button in the lower right corner of the screen.
Sync between CalenGoo and the iPhone/iPod/iPad’s calendar
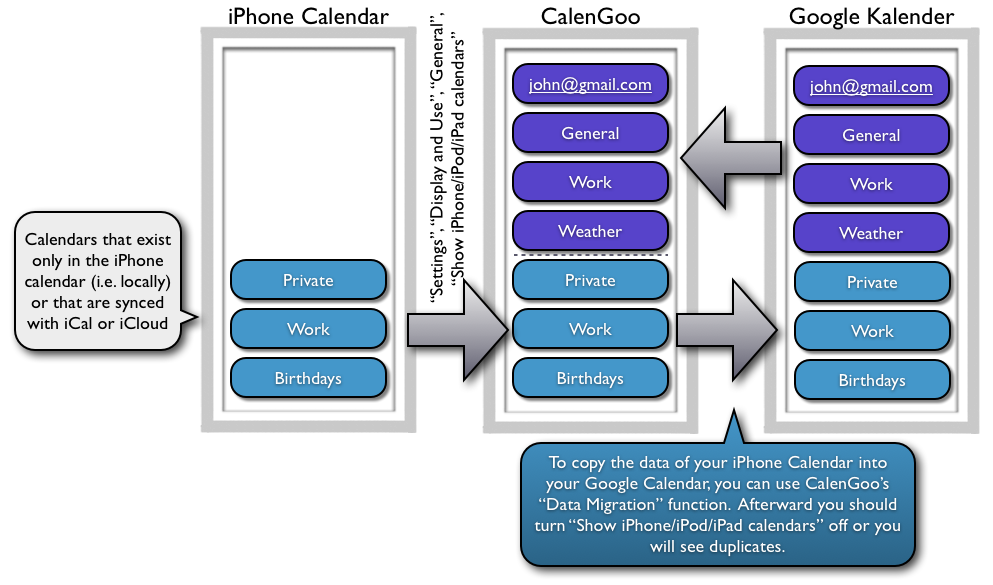
CalenGoo can display and modify the data of the iPhone/iPod/iPad’s calendar and Google Calendar. It can- either work only with Google Calendar,
- it can work with Google Calendar and the iPhone/iPod/iPad’s calendar
- or it can work only with the data of the iPhone/iPod/iPad calendar without a Google Calendar account.
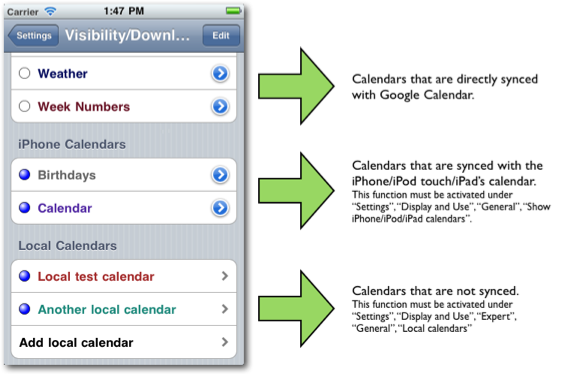
- Turn "Settings > Accounts > Show iPhone/iPod/iPad calendars" on. Afterward return to the calendar view. You should now see the iPhone/iPod/iPad's calendars in addition to your Google calendars.
To prevent getting duplicates if you have also synced your iPhone's calendar with Google Calendar, you can configure which calendars should be visible under "Settings > Visibility/Download" (otherwise you may see the same calendars and events via the direct sync and via the indirect sync with the iPhone’s calendar, making them appear twice in the calendar views).
You can also specify a new default calendar for new events under "Settings > Display and Use > Edit view > Default calendar". 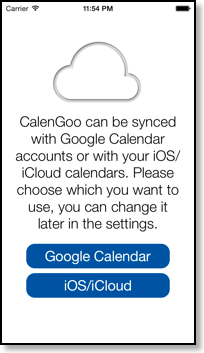 Another option is to use CalenGoo only with the iPhone's calendar. To use it this way, please tap "iOS/iCloud" after installing CalenGoo. It won't need a Google Calendar account when used this way.
If you have already configured CalenGoo to sync with your Google Calendar directly, you can tap “Settings > Accounts” and turn "Show iPhone/iPad calendars" on. And to remove the Google Calendar account in the same screen just swipe it to the left and choose "Delete".

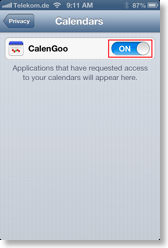
If CalenGoo does not display your iPhone/iPad/iPod touch events despite turning on “Settings”, “Display and Use”, “General”, “Show iPhone/iPad/iPod touch calendars”, then please ensure that you allowed CalenGoo to access your calendar:
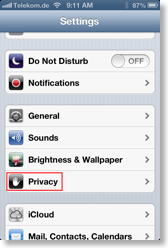
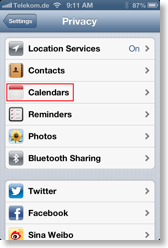
Start the “Settings” app, tap “Privacy”, “Calendars” and ensure that “CalenGoo” is turned on:
Copying data from the iPhone/iPod/iPad’s calendar into Google Calendar
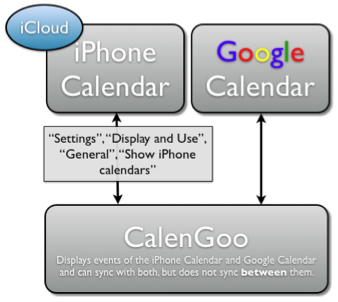
 CalenGoo can sync itself with your Google Calendar and with your iPhone/iPod/iPad’s calendar. But it cannot sync between both, it can only sync itself with both and aggregate their events and calendars in its views.
However if you would like to switch from using the iPhone/iPad/iPod calendar to using Google Calendar, there are several ways to copy your data into Google Calendar:
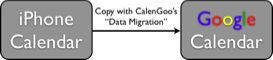
1. The "Data Migration" function in CalenGoo
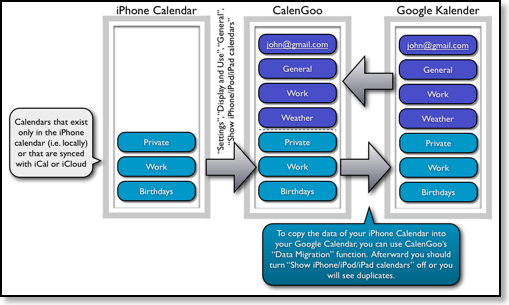
You can find this function under “Settings > Data Migration”. It is only visible if “Settings > Accounts > Show iPhone/iPod/iPad calendars” is turned on. There you can choose a source calendar, a time range and a destination calendar. It is recommended to use an empty destination calendar (please see here how to create additional calendars: Calendars). This way you can simply delete and re-create it if something goes wrong. You can create such an empty calendar by clicking “Create new calendar” under “My calendars” on the left of the Google Calendar website.
This “Data Migration” function will not check for existing events in the destination calendar. So if you run it twice, you will have all events twice in the destination calendar. That’s another reason why it is a good idea to use an empty destination calendar.
You can watch a video how the whole copy process should look like, just click the image below or download it from http://www.calengoo.com/DataMigration.mov.
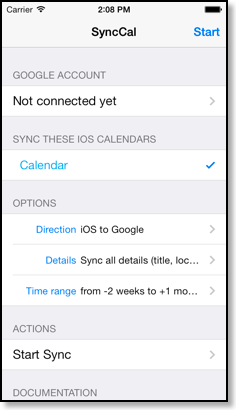
Using the "Data Migration" function you can copy your existing events from the iOS calendar into Google Calendar. This works fine if you don’t need the iOS calendar afterward any more and use Google Calendar instead. However in some cases this isn’t possible, e.g. if your iOS calendar contains a calendar that is synced with an Exchange server and thus it isn’t sufficient to sync it only once. If you are looking for a way to automatically sync such calendars at a regular interval with Google Calendar (instead of only once), please take a look at the app SyncCal.
2. Using iCal on a Mac
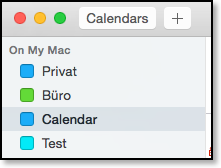
iCal has a function to export a calendar as an ICS file, which can be imported into Google Calendar. To export a single calendar, just select the calendar and then choose "File > Export > Export...".
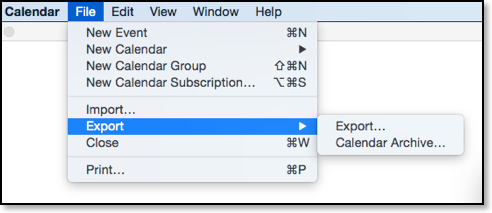
Then open Google Calendar, click on the gear icon in the upper right corner and choose "Settings > Calendars > Import calendar". You should import the ICS file into an empty calendar, otherwise it will be merged with the existing events.
3. Using the app SyncCal
The app SyncCal can copy a time range of the iOS calendar into a new calendar in your existing Google Calendar account. You can find further information about it here: http://synccal.calengoo.com
Syncing the iPhone/iPod/iPad’s calendar, CalenGoo and Google Calendar
It is possible to keep all three in sync but it is not as easy as simply using only CalenGoo. CalenGoo can display the events and calendars of both systems, the iPhone/iPod/iPad’s calendar and Google Calendar. So in CalenGoo you can easily see all your events. There is a way to also keep the iPhone’s calendar in sync with Google Calendar and copy your existing iPhone events into Google Calendar, but it is a little bit difficult: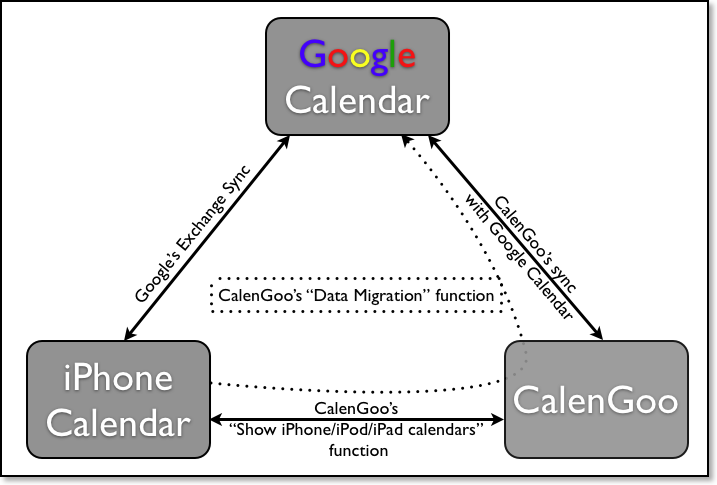
- First you have to configure CalenGoo to sync with Google Calendar and to display the iPhone/iPod/iPad calendars as describe above on this web page.
- Then you have to use CalenGoo’s “Data Migration” function to copy your existing iPhone/iPod/iPad calendars into new Google calendars. Please see the section “Copy data from the iPhone/iPod/iPad’s calendar into Google Calendar” above.
- Then you have to configure the iPhone/iPod/iPad’s calendar to sync with Google Calendar: http://support.google.com/calendar/bin/answer.py?hl=en&answer=151674 ( Google Apps users can also sync via Exchange: http://www.google.com/support/mobile/bin/answer.py?answer=138740&topic=14252 ). Please be aware that you must not create or modify recurring events with the iPhone/iPod/iPad’s calendar using this sync method, because this will result in erroneous events saved in Google Calendar that cannot be modified by CalenGoo afterward (i.e. you cannot create recurrence exceptions for these recurring events). Please see “Red dashed border” for details if you are interested.
- Now you will see a lot of duplicates: The iPhone/iPod/iPad’s calendar is displaying everything twice: Its old, local copy of the calendar and the new copy synced with Google Calendar. Tap the “Calendars” button in the iPhone/iPod/iPad’s calendar app and uncheck the old local calendars to hide them.
- In CalenGoo you will see everything three times: The local iPhone/iPod/iPad calendars, the Google calendars synced via the iPhone/iPod/iPad’s calendar and the Google calendars that are synced directly. So you have to disable/hide two of these calendars under “Settings > Visibility/Download”. Please see here for details how to hide calendars: Visibility/Download
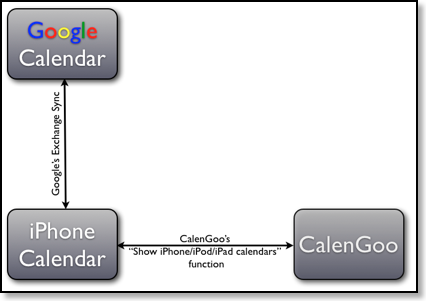
Syncing CalenGoo with Google via the iPhone/iPod/iPad’s calendar
Usually CalenGoo syncs directly with Google Calendar using its own sync functions and independent of the iPhone/iPod/iPad calendar. This has the advantage that you can assign icons to events, you can use email and SMS reminders and you can invite attendees to events. But it has the disadvantage that CalenGoo must be running to sync.You can circumvent this problem by syncing CalenGoo indirectly via the iPhone/iPod/iPad’s calendar (that can sync in the background):
That means that the events will be synced in the background, but CalenGoo still won’t know these events until it has been started. That also means that it cannot update its badge accordingly or display reminders for these new events. But the events will be there right after starting CalenGoo.
If you would like to use it this way, please follow these instructions:
- You have to configure your iPhone/iPod/iPad’s calendar to sync with Google Calendar. Just start the "Settings" app, open "Calendar > Accounts" ( or "Mail, Contacts, Calendars" on iOS9 and lower), tap "Add Account...", select "Google" and follow the instructions. You have find further information under "iPhone or iPad > Set up sync with the Apple Calendar app" here: http://support.google.com/calendar/bin/answer.py?hl=en&answer=151674
- Change CalenGoo’s configuration to let it sync with the iPhone/iPod/iPad’s calendar: If you just installed CalenGoo, you can simply tap the blue "iOS/iCloud" button. That’s all. But if you have already configured CalenGoo to sync with your Google Calendar directly, you have to tap “Settings > Accounts” and turn "Show iPhone/iPad calendars" on. Then remove the Google Calendar account in the same screen by swiping it to the left and choosing "Delete".
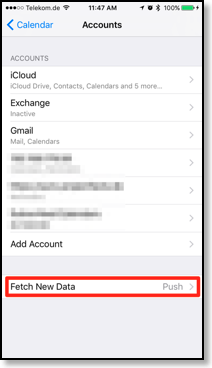
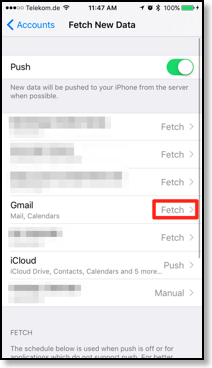
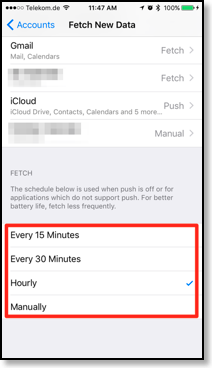
If it doesn’t update automatically, then please ensure that in the “Settings” app, “Calendars > Accounts > Fetch New Data > Gmail” is set to "Fetch" and that the "Fetch" interval is set to "15 minutes", "30 minutes" or "hourly" but not to "manually":
Uploading events
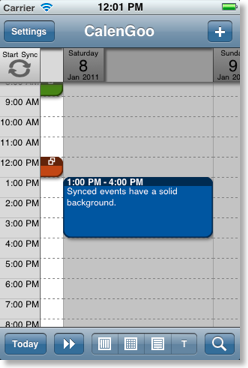
Usually CalenGoo uploads changes immediately to Google Calendar after you have entered them. This can be turned off under “Settings > Display and Use > Advanced > General > Upload w/o download” if you don’t want it. To indicate if an event was uploaded successfully, the background color of events in the day view is used. A transparent background indicates that the changes could not be uploaded yet, whereas a solid background indicates a successfully synced event: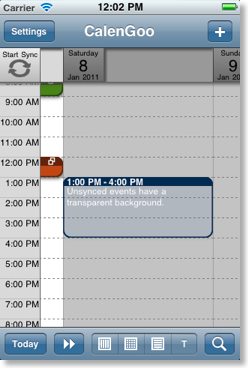
If an event could not be uploaded immediately, CalenGoo will try to upload it again during the next sync.
You can change how unsynced events are displayed under “Settings > Display and Use > Advanced > Day view > Indication of unsaved events”. There you can choose between “Transparent” (the default), “White dotted border” (so that you can better read these unsynced events) and “None” (i.e. there is not difference between unsynced and synced events).
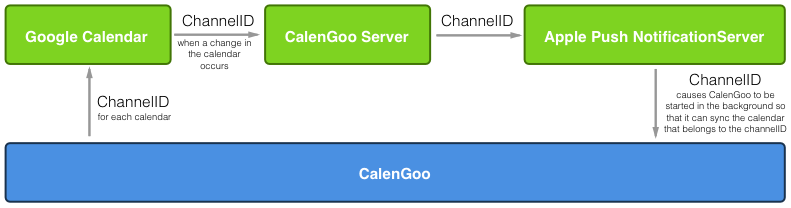
Push Sync
Starting with version 1.5.65 CalenGoo supports "Push Sync", i.e. if you make changes in Google Calendar they will appear automatically within 1-2 minutes in CalenGoo. To make this work you have to turn "Settings > Display and Use > Expert/Maintenance > All > Quick sync" and "Background sync" on and sync once afterward.Technically it works this way that CalenGoo tells Google Calendar to inform a CalenGoo server about changes in your calendars. Google Calendar will tell the CalenGoo server only which of your calendars contains changes. The CalenGoo server does not know anything about your events, i.e. your data is still safe and the CalenGoo server does not have access to them. The CalenGoo server will then send the channel-ID of the changed calendar via an Apple Push Notification to your iPhone/iPad. CalenGoo on your iPhone/iPad receives the notification and syncs that single calendar. Afterward it updates the Today Widget and recomputes the upcoming reminders: